Standard Analyses
This section covers information about accessing and running Standard Analyses reports. To learn more about Facility Profiling, Facility Submission Status, and the Medical Record Report, see Working with Analyses.
To access Standard Analyses, navigate to the Analyses tab and from the list, click Standard Analyses.

The Standard Analyses provides access to analyses that share common population setup prompts, which allows you to use the same prompt answers to run the following types of analyses:
- Risk-Adjusted Analyses
- Non Risk-Adjusted Analyses
- Complications Analyses
- PSI-90 Analyses
- Distribution Analyses
- Resource Analyses
- Readmission Analyses
- Efficiency Analyses
- Custom Comparison
The Standard Analyses page displays three tabs (Select Populationis the default).
|
Tab Names |
Select tab to... |
|---|---|
|
Select Population |
Select prompt answers to filter data and create a population for an analysis |
|
Set Up Analysis |
Select prompt answers to define row headings for an analysis |
|
Review Selections |
View current prompt answers |
Note: Prompt selections on the Select Population and Set Up Analysis tabs are retained for one hour if you close the browser window or log out of QualityAdvisor. This prevents loss of prompt selections if the browser is accidentally closed during analysis setup.
Select Population Tab
To define your population for each analsis:
-
Select either Facility or Peer for you analyses.
Note: If you select the Peer option, only facilities with published comparative data are available.
- In the Select Analysis prompt, select the type of analyses you want to see:
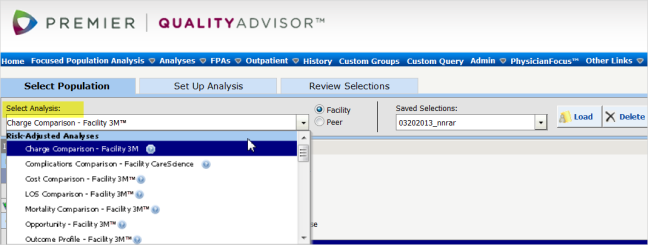
Notes: The page then displays with the prompts available for the selected analysis.
To see report-specific help, please see Standard Analyses - Facility or Standard Analyses - Peer. - Complete the required Facility, Time, and Inpatient/Outpatient prompts. See Facility and Comparative Data for more information on the Facility and Time prompts.
- Then scroll down (or select from the list on the left) to complete any optional prompts, which vary by analysis selected.
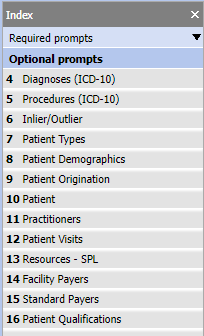
Notes: In the Diagnoses and Procedures prompts, the system displays only the codes at the level you select. For example, if you select Principal Diagnosis – 4 Digit, only 4-digit diagnoses will be available for selection in the prompt.
Custom Groups can contain diagnosis and procedure codes from all levels. Uf a Custom Group is selected in the prompts, “Custom Groups” displays in the header of the prompt and the Case Counts window.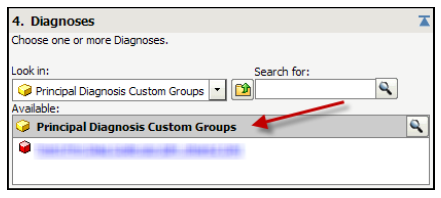
When drilling, a “Custom Groups Detail” entry displays in the Diagnoses and Procedure drill menus. These drill options are based on the contents of the custom group and should only be used on analyses that were run using Diagnoses and Procedure Custom Groups.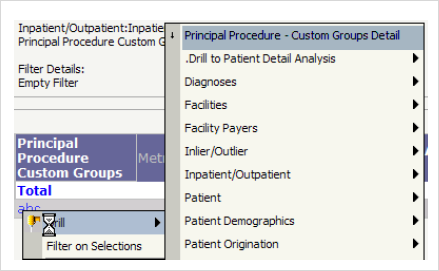
After answering any prompt, you can click the Population Count button to check the number of patients available based on the current prompt selections.
Set Up Analysis Tab
Once you have completed the required and/or optional prompts in the Select Population tab, you can navigate to the Set Up Analysis tab to define the rows and columns for the analysis.
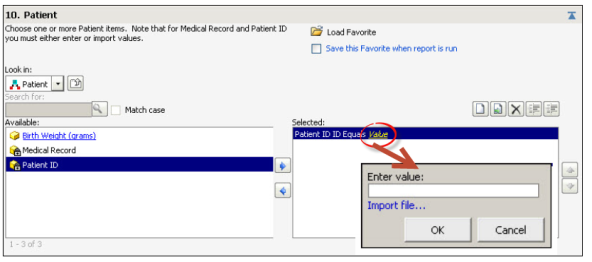
Click the right-facing arrow to move a highlighted selection from the Available box to the Selected box. Click the left-facing arrow to remove a selection.
Note: Some prompts enable you to enter a value or import a file containing values. Click the Value link to type in a value or import a file and then click OK.
The default selection for the Row Header prompt depends on the selected risk adjustment methodology.
|
If the risk adjustment methodology is |
The Row Header default is... |
|---|---|
|
CareScience Analytics |
MS-DRG |
|
3M™ APR DRG Risk |
APR DRG |
Review Selections Tab
The Review Selections tab displays the prompt selections for each completed prompt. Review prompt selections, loaded saved selections and favorites before running your analyses.
If you need to change any selections, click the Select Population tab or the Set Up Population tab and change the prompt selections. The Review Selections tab updates to display the new prompt selections when you click the tab heading.
Once finished, click the Run button to run the analysis.
Notes:
If you see an error that says the maximum number of report rows has been retrieved, your prompt selections are too broad. Return to the prompts and narrow your selections.
After you run an analysis, the prompt selections are saved and available for running additional standard analyses.
Exporting Analysis
To export your analysis:
- Click the
 button on the analysis toolbar.
 - Select your export preferences and then click the Export button.
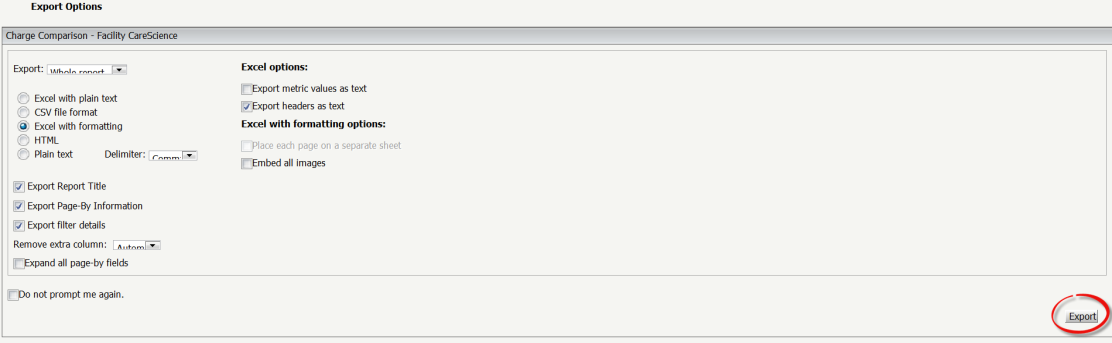
- Click Open or Save to the desired location.